How to build an API in Deno with Danet
Welcome, take a seat, and keep your keyboard at hand because today we are building a REST API in Deno using Danet. In the end, we’ll also show you how to handle authentication.
What is Deno ?
Deno is a simple, modern, and secure runtime for JavaScript, TypeScript, and WebAssembly that uses V8 and is built in Rust.
-
Provides web platform functionality and adopts web platform standards.
-
Secure by default. No file, network, or environment access, unless explicitly enabled.
-
Supports TypeScript out of the box.
-
Ships only a single executable file.
-
Has built-in development tooling like a dependency inspector (deno info) and a code formatter (deno fmt).
You can learn more here on Deno’s official website https://deno.land/
What is Danet ?
Danet is a new open-source framework. Nest was one of the greatest tools to improve architecture of NodeJS project. Danet wants to bring the same level of pro-efficiency and professionalism into Deno’s world.
Exactly like Nest, Danet provides an out-of-the-box application architecture that allows developers and teams to create highly testable, scalable, loosely coupled, and easily maintainable applications.
It is entirely made in Typescript.
You can find the documentation here : https://savory.github.io/Danet/
And the GitHub repository : https://github.com/Savory/Danet
Installation
First thing first, we need to have Deno ≥ v1.24.3
Deno (updated on 27th August 2022)
Deno ships as a single executable with no dependencies. You can install it using the installers below, or download a release binary from the releases page.
Shell (Mac, Linux):
curl -fsSL https://deno.land/install.sh | sh
PowerShell (Windows):
irm https:deno.land/install.ps1 | iex
Homebrew (Mac):
brew install deno
See deno_install for more installation options.
Danet
The easiest way to start a Danet’s project is to clone the starter project from the following GitHub repository:https://github.com/Savory/Danet-Starter
git clone git@github.com:Savory/Danet-Starter.git
Basic tutorial
The starter project is a simple in-memory REST API for a to-do list.
Here is how the project looks:
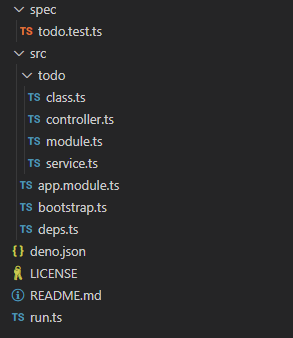
We will go through each file’s content except for LICENSE, README and todo.test.ts
src/deps.ts
In Deno, it’s best to provide our dependency version number in our code, as there is no external file that lists our dependencies.
This file export our third-party dependencies. In our code, when we will need something from danet , we will import it from deps.ts .
If we ever need to upgrade a dependency, we change the version number in deps.ts .
src/todo/class.ts
Simplest file, we define our Todo class.
src/todo/controller.ts
Controllers are responsible for handling incoming requests and returning responses to the client.
A controller’s purpose is to receive specific requests for the application. The routing mechanism controls which controller receives which requests. Frequently, each controller has more than one route, and different routes can perform different actions.
In order to create a basic controller, we use classes and decorators. Decorators associate classes with required metadata and enable Danet to create a routing map (tie requests to the corresponding controllers).
We use the @Controller() decorator, which is required to define a basic controller. We’ll specify an optional route path prefix of todo. Using a path prefix in a @Controller() decorator allows us to easily group a set of related routes, and minimize repetitive code. For example, we may choose to group a set of routes that manage interactions with a customer entity under the route /customers. In that case, we could specify the path prefix customers in the @Controller() decorator so that we don’t have to repeat that portion of the path for each route in the file.
The constructor(public todoService: TodoService) uses Dependency Injection. Danet is built around this strong design pattern. We recommend reading a great article about this concept in the official Angular documentation.
src/todo/service.ts
This service, which is automatically injected into TodoController thanks to the @Injectabledecorator, contains all our business logic.
For simplicity’s sake, it only stores Todos in memory. However, for your real projects, storage should be handled by a todoRepository class injected into TodoService.
src/todo/module.ts
A module is a class annotated with a @Module() decorator. The @Module() decorator provides metadata that Danet makes use of to organize the application structure.
The @Module() decorator takes a single object whose properties describe the module:
-
injectablesthe injectables that will be instantiated by the Danet injector and that may be shared at least across this module -
controllersthe set of controllers defined in this module which have to be instantiated -
importsthe list of imported modules that declare the injectables which are required in this module
Our application being fairly simple, we only have TodoController and TodoService.
src/app.module.ts
The AppModule import all modules you want your application to use. In our case, TodoModule is sufficient.
src/bootstrap.ts
The bootstrapfunction create a DanetApplication instance and initialize it with our AppModule . Behind the scene, it resolves and injects dependencies; creates route handle etc….
This does not make the http server listen to any port yet.
run.ts
It is the entry point of our app. This file is executed by Deno when we execute the launch-server task defined in deno.json .
bootstrap function create a DanetApplication instance, and we call listen method to listen (not very explicit I know /s) on a given port either from env or default to 3000 (no specific reason).
deno.json
Deno’s configuration file.
It defines 2 tasks, launch-server and test , which means that you can execute deno task launch-server to run the server, and deno task test to run tests that are in the spec folder.
Let’s take a second to talk about Deno’s arguments:
-
allow-net allownetwork access. You can specify an optional, comma-separated list of IP addresses or hostnames (optionally with ports) to provide an allow-list of allowed network addresses. -
allow-envAllow environment access for things like getting and setting environment variables. Since Deno 1.9, you can specify an optional, comma-separated list of environment variables to provide an allow-list of allowed environment variables. -
allow-readfor file system read access. You can specify an optional, comma-separated list of directories or files to provide an allow-list of allowed file system access.
Full documentation is accessible here : https://deno.land/manual@v1.25.0/getting_started/permissions#permissions-list
That’s it. With all the provided code (taken from Danet Starter Repository), you should have a REST API up and running !
But Thomas, you told us we were going to see how to handle Authentication with Danet !
You are right pal, let’s talk about
Guards
A guard is a class annotated with the @Injectable() decorator, which implements the AuthGuard interface.
Guards have a single responsibility. They determine whether a given request will be handled by the route handler or not, depending on certain conditions (like permissions, roles, ACLs, etc.) present at run-time. This is often referred to as authorization.
Here is an over simplified example of a guard :
The logic inside the validateRequest() function can be as simple or sophisticated as needed. The main point of this example is to show how guards fit into the request/response cycle.
Every guard must implement a canActivate() function. This function should return a boolean, indicating whether the current request is allowed or not. It can return the response either synchronously or asynchronously via a Promise.
Danet uses the return value to control the next action: if it returns true, the request will be processed. if it returns false, Danet will deny the request.
Guards can be attached to a Controller, a Method/Route, or even registered as global guards (that will be used for EVERY ROUTE).
To attach it to our TodoController we just need to use @UseGuardsdecorator as following:
@Controller('todo')
@UseGuards(SimpleGuard)
export class TodoController {
....
}
You can set up a global guard by providing it to the AppModule the following way :
 import { Module, AuthGuard, GLOBAL_GUARD } from 'https://deno.land/x/danet/mod.ts';
@Module({
  providers: [new TokenInjector(SimpleGuard, GLOBAL_GUARD)],
})
export class AppModule {}
That’s it folks !